
Hello Dear Reader,
So, you have a project idea, but you are not sure which board to choose that will serve as the brain of your device? So here I will be giving you a comprehensive short technical background idea of individuals platform. Ok so Let see in below,
If you just want to master circuitry, programming, or Linux and you don’t have any particular purpose other than learning, the best option would be to pick one of the ready-made training kits.
However, if you are already familiar with the subject and have a particular project to work on, this guide will help you determine the right development platform and make an informed about available choice.
First of All development platforms can be divided into 2 categories:

Microcontrollers can simultaneously perform just one task, but they can perform it impeccably. Single-board computers execute programs within their operating system (Linux mostly). Besides, the latter have higher productivity and more powerful multimedia capabilities.
There are also hybrid platforms where the microcontroller and the processor are placed on the same board. The idea is to leave all the hard work to the powerful processor, such as access to the network or media processing. At the same time, the microcontroller is assigned the function of fine motor control, as well as control of relays, sensors, and other electronic peripherals. You can create hybrid platforms by yourself if you take a board from each family. All of them will have common interfaces through which you can organize their interaction.
You can find very specific boards in both families, which will stand out thanks to one single feature. Nevertheless, the table below will help you compare the capabilities of the average microcontrollers and computers.
Thus, depending on your objectives, you determine whether you need a microcontroller or a computer. How to decide what kind of board is best suitable for you?Since there is not much point in comparing microcontrollers and microcomputers in detail, we shall separately list the advantages and disadvantages of specific boards within their families.
If we consider the microcontroller board apart from the goals of your project, it is difficult to describe objectively and in a few words the advantages and disadvantages of different platforms. Common disadvantages can play little role in your project or even turn out to be great advantages. We have tried to compare the boards basing our comparison on the capacity of the DIY flagship Arduino Uno platform since the boards of this particular family have given an incredible kick in the development of hobby electronics worldwide under the fastest development. Various companies produce modules, sensors, extensions with “Arduino compatible” or “Designed for Arduino” shields, etc. Behind it stays an electronic and software compatibility primarily with Arduino Uno, and only then with the rest of the platforms.
Generally, using tricks or additional components can help you connect anything to anything. However, you want to focus on your project rather than on your fight with electronics. Therefore, the most sensible idea is to compare any board on the microcontroller with Arduino Uno. So let’s do it.
Arduino Uno
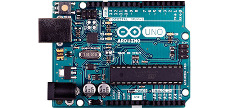
A 16 MHz processor, 32 KB ROM, and 2KB RAM, 20 input-output ports, 6 analog inputs, 6 PWM channels, and 2 hardware interrupts may not be impressive, but without the support of the operating system and the interpreters, they allow to solve almost any problem of controlling a variety of sensors and actuators. It will help you deal with piles of documentation, lessons, and libraries.
Arduino Uno represents a huge community and allows to easily master the Arduino IDE environment with Arduino C ++ used as its major programming language. All these features will make the process of your familiarizing with the platform much simpler.
The voltage of 5 V, which is the de facto standard, and pads for installing expansion cards, as well as analog inputs and all kinds of hardware interfaces, will allow you to connect almost any peripherals, sensors and actuators.
Arduino Leonardo
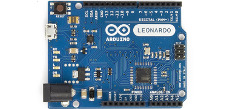
It’s the same as Arduino Uno, but it has a different microcontroller, which is of the same class and has some advantages over its Arduino Uno analog.
Arduino Leonardo has a larger number of analog inputs (12 vs. 6) for sensors, more PWM channels (7 vs. 6), more pins with hardware interrupts (5 vs. 2), as well as separate independent serial-interfaces for USB and UART.
Arduino Leonardo can act as a keyboard or a mouse (HID-device) for your computer. This makes it easier to create your own input device.
The pinout is slightly different from Arduino Uno, which may cause possible incompatibility with some expansion cards. However, such cases are rare, and in our shop, we explicitly specify them.
- It’s the same as Arduino Uno, but it has a different microcontroller, which is of the same class and has some advantages over its Arduino Uno analog.
- Arduino Leonardo has a larger number of analog inputs (12 vs. 6) for sensors, more PWM channels (7 vs. 6), more pins with hardware interrupts (5 vs. 2), as well as separate independent serial-interfaces for USB and UART.
- Arduino Leonardo can act as a keyboard or a mouse (HID-device) for your computer. This makes it easier to create your own input device.
- The pinout is slightly different from Arduino Uno, which may cause possible incompatibility with some expansion cards. However, such cases are rare, and in our shop, we explicitly specify them.
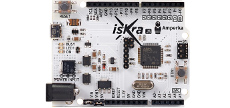
Iskra Neo
It’s the same as Arduino Leonardo but is produced in Russia.
It’s significantly cheaper than its original analog.
- It’s the same as Arduino Leonardo but is produced in Russia.
- It’s significantly cheaper than its original analog.
Arduino Mini
It’s the same as Arduino Uno, but of a different form factor. A space-saver measuring only 30×18 mm.
Because of its form factor, it’s not that easy to install Arduino expansion cards on it. Connection with additional modules is performed with the help of wires or through the breadboard.
There is no USB port included, so you will have to upgrade the firmware with a separate USB-Serial adapter.
- It’s the same as Arduino Uno, but of a different form factor. A space-saver measuring only 30×18 mm.
- Because of its form factor, it’s not that easy to install Arduino expansion cards on it. Connection with additional modules is performed with the help of wires or through the breadboard.
- There is no USB port included, so you will have to upgrade the firmware with a separate USB-Serial adapter.
Iskra Mini
It’s the same as Arduino Mini, but is produced in Russia.
It’s significantly cheaper than its original analog.
You can get it with unsoldered pads and sealed holes.
- It’s the same as Arduino Mini, but is produced in Russia.
- It’s significantly cheaper than its original analog.
- You can get it with unsoldered pads and sealed holes.
Arduino Micro
It’s the same as Arduino Leonardo, but of a different form factor.
A space-saver measuring only 48×18 mm.
Because of its form factor, it’s not that easy to install Arduino expansion cards on it. Connection with additional modules is performed with the help of wires or through the breadboard.
- It’s the same as Arduino Leonardo, but of a different form factor.
- A space-saver measuring only 48×18 mm.
- Because of its form factor, it’s not that easy to install Arduino expansion cards on it. Connection with additional modules is performed with the help of wires or through the breadboard.
Arduino Mega
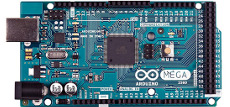
It’s the same as Arduino Uno, but it contains a more powerful microcontroller of the same architecture.
An excellent choice for more serious projects or if your Arduino Uno is no longer capable of performing more complex tasks.
It contains significantly more memory: 256 KB of ROM and 8 KB of RAM, as well as more ports: 60, of which 16 are analog and 15 with PWM. It’s also a bit longer than Arduino Uno: 101 × 53 mm vs. 69 x 53 mm.
Arduino Due

- One of the most powerful boards from Arduino with a Cortex-M3 microcontroller and the form factor similar to Arduino Mega.
- 84 MHz processor and 512 KB of memory. 66 IO pins, 12 of which can serve as analog inputs, 12 support PWM and all 66 can be configured as hardware interrupts.
- Inbuilt CAN bus controller allows you to create a network with the help of Due or interact with in-car electronics. Two DAC channels allow you to synthesize the stereo sound with a resolution of 4.88 Hz.
- The optimal voltage for the board is 3.3 V, rather than the traditional 5 V. Make sure that the selected peripherals support the work on this level or try installing a voltage converter.
Iskra JS
- A board with an Espruino core programmed in JavaScript.
- JavaScript – a high-level language. Programs are easier to write, since they are more compact and more informative, especially if we are talking about string operations, large amounts of data and the web interface.
- Powerful 168 MHz Cortex M4 microcontroller, 1 MB of Flash memory, 192 KB of RAM, dozens of ports with PWM and analog inputs, 2 analog outputs, several I²Cs, SPIs, and UARTs - all this allows us to connect and work simultaneously with a variety of sensors and modules.
- Although the optimal voltage for the board is 3.3 V, the pins are also tolerant to 5 V, and the connection of 5 V peripherals is trivial.
- There may be no existing library for the selected peripherals due to a different ecosystem and development environment, so you will need to create it on your own.
Strela

- This "all in one" robotic platform contains the majority of the things that are necessary to create any light mobile robot. Strela, like any other Arduino, is programmed from Arduino IDE, and it contains the same microcontroller as Arduino Leonardo.
- Inbuilt driver for two motors, 4 jacks for servomotors, 4 switches, and 4 LEDs that can be used for any purposes, a buzzer, slots for an LCD screen, and a wi-fi module.
- A powerful power regulator allows you to easily use several different batteries.
- 11 inputs and outputs appear as 3 contact pins for the connection of additional sensors and modules. The LCD, the switches and the LEDs are connected through the port replicator, so they do not take any of the general-purpose inputs and outputs.
- There are no pads on the board to install Arduino expansion cards.
- Since the pin numbering has been modified (as compared to Arduino Leonardo), slightly different functions should be used to work with the board pins.
Arduino Yùn

- A unique hybrid of Arduino Leonardo and a microcomputer running on OpenWRT Linux. An excellent choice for the IoT.
- The board is equipped with Ethernet and WiFi, through which you can communicate with the device and even jailbreak it remotely.
- The power of Linux allows working with multimedia, and its network capabilities easily integrate with social networks and other web services.
- OpenWRT is a cut Linux. However, you cannot install any of the Linux software on the microcomputer. Only Bash and Python from the coding box software can be used as script codes.
STM32 Nucleo F401RE

- A board with a powerful Cortex-M4 microcontroller. The platform is programmed not via Arduino IDE, but via the mbed.org online environment. Subjectively, it is thinner and more powerful than Arduino IDE, although not as widely used. It’ll be a great choice for an inquisitive mind.
- An 84 MHz processor, 512 KB of ROM and 96 KB of RAM, 50 input-output ports, of which 16 are analog and 29 with PWM. Although the optimal voltage for the board is 3 V, there should be no problem of compatibility with Arduino peripherals.
- The pads for expansion cards are the same in configuration as the pads for Arduino Uno, therefore a lot of Arduino expansion cards can be installed on Nucleo.
- There is no separate SPI port on the board. You will have to use special tricks to make Arduino expansion cards work with SPI through the ICSP port.
- There may be no existing library for the selected peripherals due to a different ecosystem and development environment, so you will need to create it on your own.
Teensy 3.2
- A compact board with a powerful Cortex-M4 microcontroller. The platform is programmed via the usual Arduino IDE.
- Smaller than Arduino Micro (35 × 17 mm), but almost as powerful as Nucleo: a 72 MHz processor, 256 KB of ROM and 64 KB of RAM, 34 input-output ports, of which 21 can be analog, and 12 support PWM.
- Teensy 3.1 is very energy efficient. It does not have a voltage regulator, but the input voltage can be any from 3.3 V to 5.5 V. The same voltage will be its data level. In sleep mode, it consumes only 0.25 mA, which makes it possible to operate on battery power for several months.
- Inbuilt CAN bus controller allows you to create a network with the help of Due or interact with in-car electronics. Two DAC channels allow you to synthesize the stereo sound with a resolution of 4.88 Hz.
- The board comes with unsoldered contacts. You will have to solder pin connectors or wires on your own.
- Because of a large difference in the architecture with classic Arduino, not all third-party libraries for peripherals may work out of the box.
- The operating voltage is equal to the input voltage, which is why it often changes as the batteries discharge. This can be important when choosing a peripheral, especially if it is designed for a specific voltage.
Netduino 2
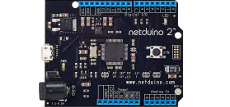
- The board follows the form factor of Arduino Uno, but has a powerful stuffing sufficient for the execution of programs written in .NET. Netduino is programmed in C# or any other .NET-language in the Visual Studio environment familiar to any .NET-developer. .NET Micro Framework is provided with a standard library.
- Autocomplete, tips, context help in MSDN and a full debugger all function in Visual Studio. Breakpoints are available to you, as well as step-by-step execution of the code and monitoring variables. Debugging is simple and does not involve any tricks, you just need to connect a USB-cable. Thanks to all this, the speed of development for Netduino at times exceeds the speed of development for any other platform.
- There is no separate SPI port on the board. You will have to use special tricks to make Arduino expansion cards work with SPI through the ICSP port.
- There may be no existing library for the selected peripherals due to a different ecosystem and development environment, so you will need to create it on your own.
Netduino Plus 2

- The same as Netduino, but more powerful and with Ethernet. An excellent choice for IoT projects.
- It has the same drawbacks as Netduino 2.
- The same as Netduino, but more powerful and with Ethernet. An excellent choice for IoT projects.
- It has the same drawbacks as Netduino 2.
Comparison of single-board computers:
A trendsetter among the SBC is Raspberry Pi. This super-popular platform once completely changed the idea of the capabilities, size, and cost of a full-fledged computer for DIY-electronics.Again, different SBCs may be suitable for a particular project, but due to the popularity of Raspberry Pi, we will be comparing other platforms with it.
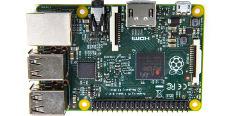
Raspberry Pi 3 Model B

- One of the most popular SBCs. Four 1200 MHz cores, 1GB of RAM and full-fledged Linux based on Debian will help you solve many problems concerning computing power. Among them, we can name computer vision, real-time sound processing, and the creation of web services.
- It will help you deal with piles of documentation, lessons, and libraries. Raspberry represents a huge community. All these features will make the process of your familiarizing with the platform much simpler.
- The usual HDMI ports, 3.5mm audio, and 4 USB ports will help you easily connect a monitor, speakers, a keyboard, a mouse, and other USB devices. BLE and WiFi modules will help you perform a wireless connection of your computer to other devices.
- There is no ADC on the board, so the connection of analog sensors is only possible with the help of external additional components.
- There is only 1 hardware PWM channel available, which complicates the work with the periphery controlled by PWM.
BeagleBone Black
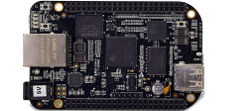
- A microcomputer is similar to Raspberry Pi, which gives benefits that microcontroller boards usually have. A great choice for IoT projects that need to be managed with a variety of sensors and actuators.
- A powerful environment for Cloud9 IDE development. You simply access BeagleBone through your web browser and start programming in your favorite programming language, be that Python, JavaScript (Node.js), Bash, or any other Linux language. The result can be checked immediately and if something does not work, you can use the inbuilt full-fledged debugger.
- There is already 4 GB eMMC Flash memory installed together with the Linux operating system. Memory can be increased with an external microSD card. A lot of opportunities for connecting peripherals.
- 8 PWM outputs and 7 analog inputs. Hardware interrupts are possible.
- A micro-HDMI port to connect a monitor, which is rather unusual. It is also used to transmit sound.
- Computational performance is lower than that of Raspberry Pi: there is 1400 MHz core and 512 MB of RAM.
Extremely helpful but while purchasing hardware we will always thinking more functionality with updated hardware������������������
ReplyDeleteGood summary while purchasing hardware kits
ReplyDeleteGood summary for selecting boards.
ReplyDelete